Department Microstructure and Residual Stress Analysis
X-ray diffractometer - LEDDI
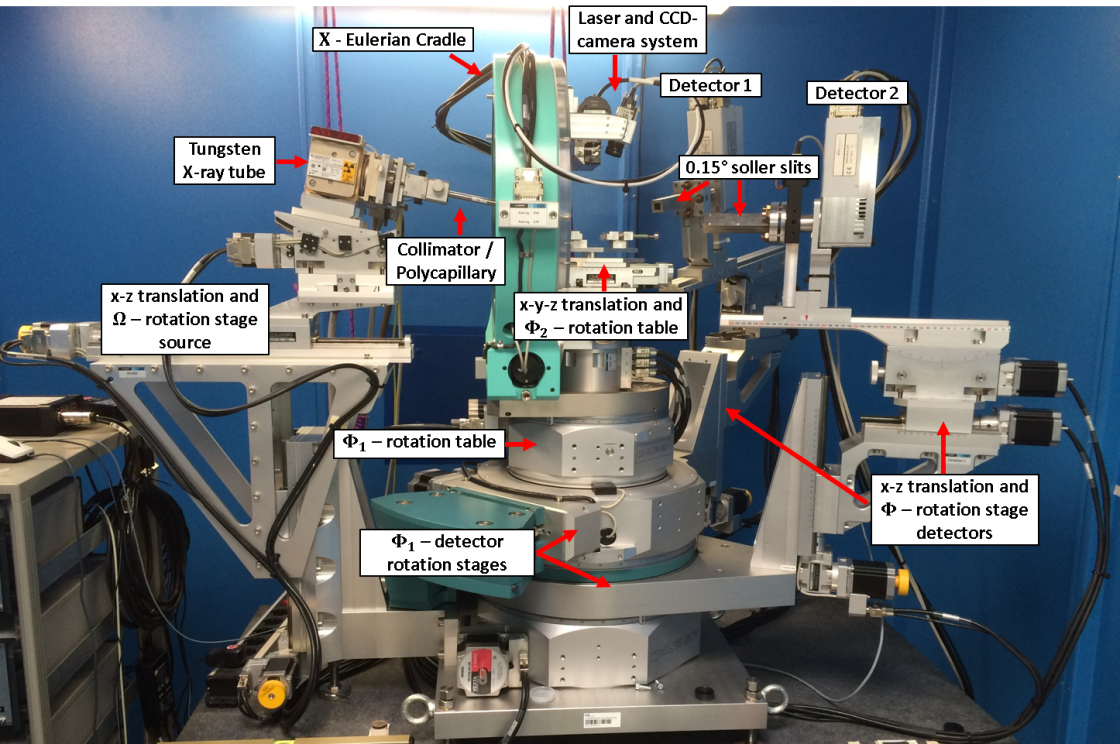
To perform energy-dispersive analyses of residual stresses, texture and other microstructural parameters, the energy-dispersive 8-circle X-ray diffractometer LEDDI (Laboratory Energy Dispersive DIffraction), developed in cooperation with the University of Kassel / Chair of Prof. Scholtes and the company Huber Diffraktionstechnik GmbH & Co. KG, is available at HZB.
By using the continuous bremsstrahlung spectrum generated in a conventional tungsten long fine focus X-ray tube, an energy range up to 60 keV is covered in the present case. Thus, much higher penetration depths in the material can be achieved than is usually possible by using angle-dispersive laboratory X-ray diffractometers. The diffracted radiation is detected by two identical model SER-25 energy dispersive Si(Li) detectors from Baltic Scientific Instruments (BSI), which are cooled by Peltier elements. Both detection systems can be moved independently in the vertical as well as in the horizontal plane. In this way, it is possible to realize different diffraction angles or measurement directions (φ,ψ) for each detector. By arranging both systems appropriately and then combining all the data collected by them, a significant reduction in the required experimental times can be achieved.
To adjust the primary beam cross-section, collimators, monocapillaries of different diameters, and a combination of collimating polycapillary system and apertures are optionally available. To minimize the divergence of the diffracted radiation, both detector systems are each equipped with a 0.15° collimating aperture. The orientation of the source and detectors to the sample is achieved by a combination of rotational and translational movements. To define the measurement position on the sample surface, the instrument has an x-y-z translation stage and a CCD camera system. A laser triangulation system is used to define the correct sample height. Furthermore, for the realization of different sample orientations (φ, ψ), a Χ-Eulerian cradle as well as two Φ-rotation stages are available. Thereby, the rotation around the Φ1-axis allows a direct sample rotation around the scattering vector and the device is thus very flexible with respect to the processing of a wide variety of material science problems. The control of the axes as well as the acquisition of the measurement data is carried out via the SPEC software®.

